
You have no items in your shopping cart
How to Plan Your Own Lab Reactor
- Posted on
- Posted in Glass Reactors
- 0
Guide To Building Your Lab Reactor - Customize Your Reactor System
Laboratory reactors are intricate pieces of equipment that apply to various different applications, most of them are so specific that there could never be a “one size fits all” solution for lab reactors. Every process and every lab layout is different, meaning each reactor system must be adjusted properly. At Goldleaf Scientific, we have unique customization options most other suppliers do not offer. Not only can we help design your system, but we can make custom changes and upgrades with our manufacturing capabilities. Our shop is fitted with a glassblowing studio, machining for ptfe and metal, along with assembly capabilities such as making a custom explosion proof reactor fit your local standards and fire code.
Standalone reactors will always be one of our specialties, but we can also help users design custom skids. If a process requires feeding from a large tank, we can customize the connection options to make sure the reactor hooks up properly. Same for the drain port if the reactor is emptied into another system such as a solvent evaporator for recovery. Our setups can fill a reactor, mix or homogenize the solution as needed, and empty into our rotary evaporators or other post processing equipment.
Planning your reactor
There are a few basic questions to account for when planning your reactor skid design. Consider your mixing needs, will an overhead stirrer do, or do you need to emulsify oils and waters with a homogenizer? If working with solids, how thick will the solution be, and do you plan to break down these solids into smaller particles?
Heating and cooling are key elements of a reactor, so consider the need for temperature control. Do you need a heater or chiller to control the temperature?
What kind of solvent are you using? Is it so corrosive you need special gaskets and seals? Or is the solvent so volatile you need a fume hood? When this solvent evaporates, do you plan to recondense it back into your solution, or separate and remove the vapors entirely? Does this solvent or process require a vacuum pump, and what type of pump is needed?
Asking yourself these questions before moving forward is key to understanding your needs in equipment. Do not worry, we will get more in depth with each of these questions as we start planning the reactor build out below.
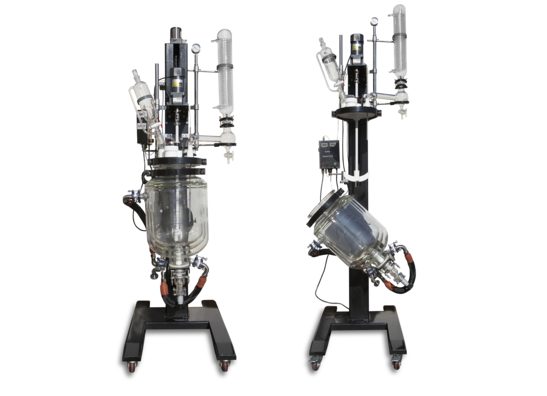
Step 1 - Choose Your Frame

The stainless steel frame is the foundation of any reactor skid. Based on what type of reactor you need, you will determine the exact frame required. Usually these come together with your choice of body style and size, but it is important to understand the varieties of frames to decide exactly what reactor build you will move forward with.
Standard frame is a stainless steel scaffold that firmly hold your reactor in place. Usually fitted with caster for easy transport, these frames are most common and used with systems that use easy to clean liquids.
Lifting frame is fitted with the ability to lift your reactor lid and lower or tilt the reactor body for easy collection of solids or crystals. When using a large or crystallizing reactor, having the lift is absolutely needed for reaching into the bottom of the reactor to scoop out solids or clean off the surface. Usually, anything larger than a 10L reactor body is fitted with a lifting frame unless otherwise stated. Some reactors use hand powered cranks but these take time, while an electric lifting reactor raises or lowers at just the push of a button.
Filter reactor frames are slightly different. If you plan to filter your solution immediately after its time in the reactor, we recommend using a reactor with a built-in filter plate at the bottom. By doing so, users eliminate the need for an additional filter setup. Filter reactor frames come in standard or lifting options depending on what the process looks like.
Step 2 - Choose the body style
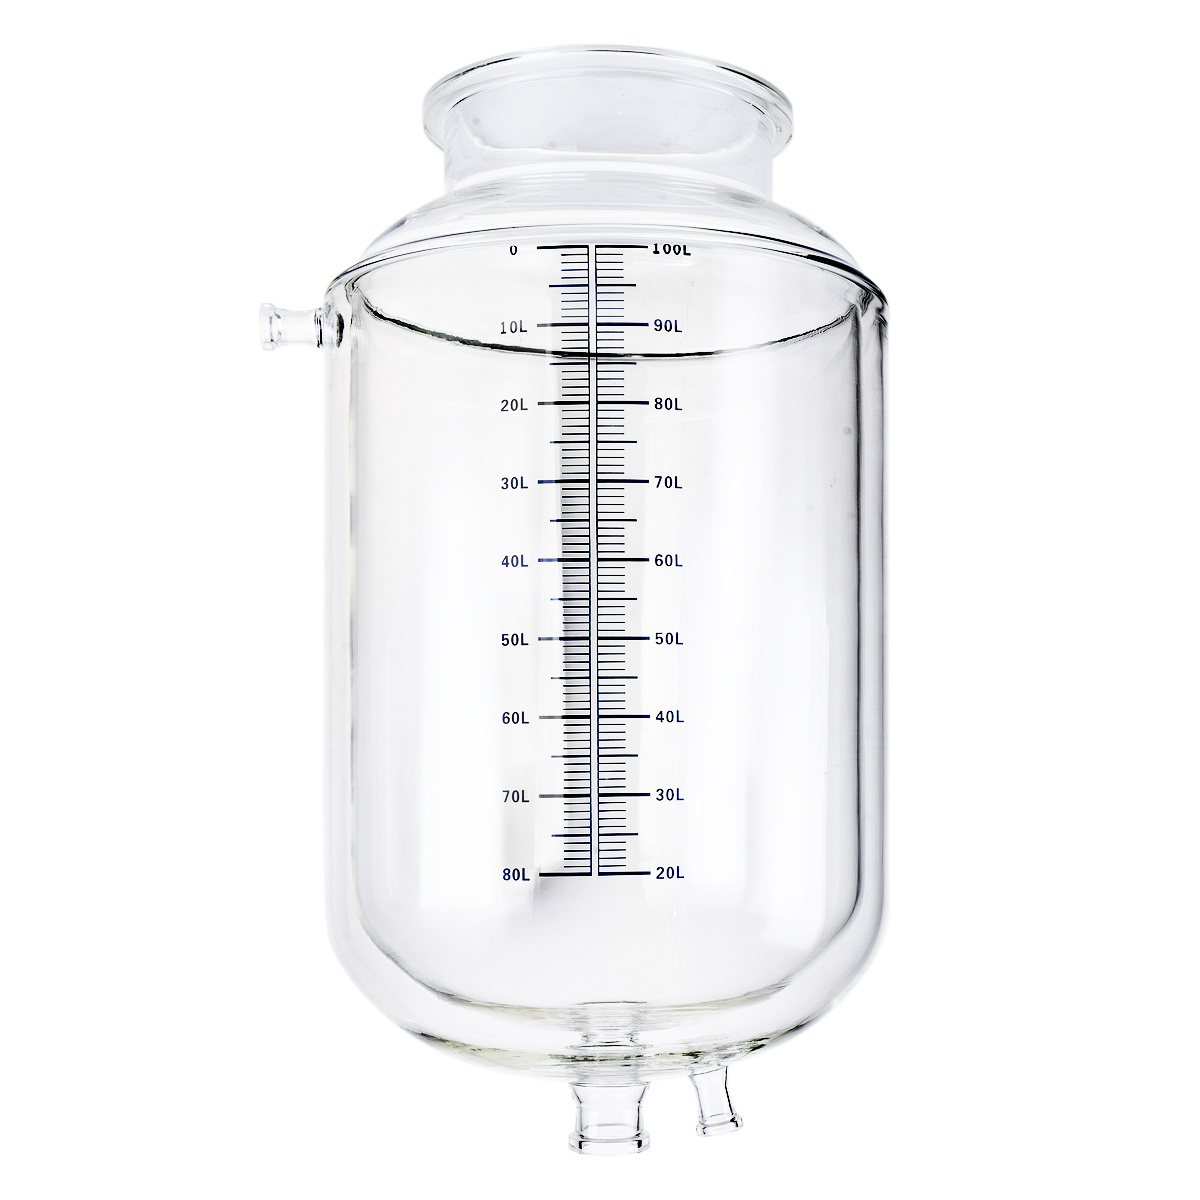
Jacketed reactors use an extra layer of glass insulation to maintain a constant set temperature decided by the user. A recirculating heater/chiller will pump fluid through this external layer of glass and ultimately raise or lower the temperature of the solution on the reactor. Any reaction or process that is temperature sensitive will require a jacketed reactor and a heater or chiller, which we will discuss in a later step.
Single Jacket reactors have one extra layer of glass around the reactor body. These are usually more cost effective options for users that do not require precise temperature control, but rather just need to keep temps within a certain range. These bodies are good for keeping things warm or cold, but may struggle to keep exact temps due to the energy loss from the ambient room temperatures.
Double Jacket reactors have an extra layer of vacuum insulation surrounding the inner layer where the heat transfer fluid flows. This extra vacuum layer is useful for multiple reasons, firstly it lowers energy costs by retaining heat or cold within the reactor, rather than losing it the the air in the lab. Also, when a reactor is used for extremely cold processes, this second layer prevents any condensation from fogging up the glass and obscuring the view of the solution. For users who need exact temperatures dialed in, a double jacket reactor is their best option.
Step 3- Choose Size

The size of the reactor will obviously relate to the scale of your process. Are you mixing a couple liters at a time for testing purposes, or doing a large scale reaction for production purposes, say 50 liters or more? When deciding the size of your reactor, account for extra headspace that will be used when stirring or evaporation of solvents.
We carry sizes from 500mL to 150L+, for reference, anything over 10L is referred to as pilot scale size, and any reactor smaller is considered a benchtop model.
Step 4 - Choose Stirring Motor
Every reactor setup comes with a stirring motor of the user's choice mounted atop the reactor vessel.
A standard model is a high torque, electric stirrer with digital controls. To upgrade from here, the next step is an air powered motor. An air powered motor is a budget friendly option for processes that use volatile solvents that give off potentially flammable vapors.
An air powered motor will be connected to an external air compressor, thus there will be no electronic motor giving off a spark right above the reactor. Keep in mind that these motors do require a high powered air compressor to operate, which can be useful to operators that already have a compressor for other uses.
Finally, an explosion proof motor is also used when flammable vapors are present, but is ideally wired directly into the wall of the facility. An explosion proof motor is electric but sealed so no vapors can ignite. When using any forms of volatile vapors, we highly recommend adding a fume hood to deal with vapors from filling and draining solvents. Even when using a standard motor, a fume hood could be enough to deal with vapors and thus not require an additional upgraded motor.
Step 5 - Choosing an impeller

There are a a wide variety of stirring shafts for reactors, from food grade for beverages to industrial for strong chemicals. Take into account the material of the impeller shaft, is ptfe best for a food grade mixture, and stainless steel better for corrosive chemicals? Start by deciding which material is best, then which type of blades or paddles should be on the end.
Paddle shafts are best for mixing solutions, when basic stirring is enough. When dealing with solids, a sharp bladed end can break up materials and blend them into a solution. Listing all of the types of impellers here would overwhelm this article, so be sure to research or call in and ask what type of shaft paddle works for you.
Step 6 - Choose Your Heater or Chiller
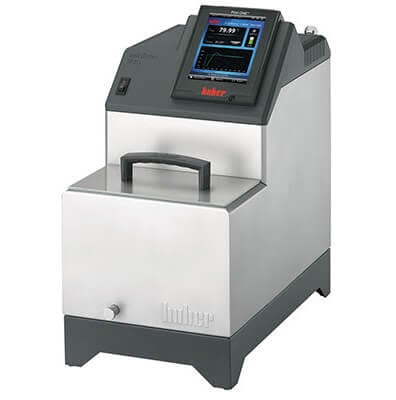
For users who only need to warm up a viscous solution to make it easier to stir, a recirculating water heater should suffice. As for those who must chill their solution for degradation, a recirculating oil chiller can keep a reactor cold. However, as temperature requirements become more precise, the heater or chiller must be able to accommodate this. If a user needs to maintain tight temperature ranges, a high powered heater chiller combo is best as it can warm or cool the vessel as needed. Whereas a sole heater or chiller must wait for the energy to escape into the room for changing temperatures, which may take too long and lead to wild swings in heat. Choosing the proper heater or chiller is actually quite in depth when taking into account things like power requirements, chilling power, Kw’s of heating, and more. At the end of this blog is a link to an article detailing how to decide the best heater or chiller for your system.
Step 7 - Choose Your Vacuum Pump
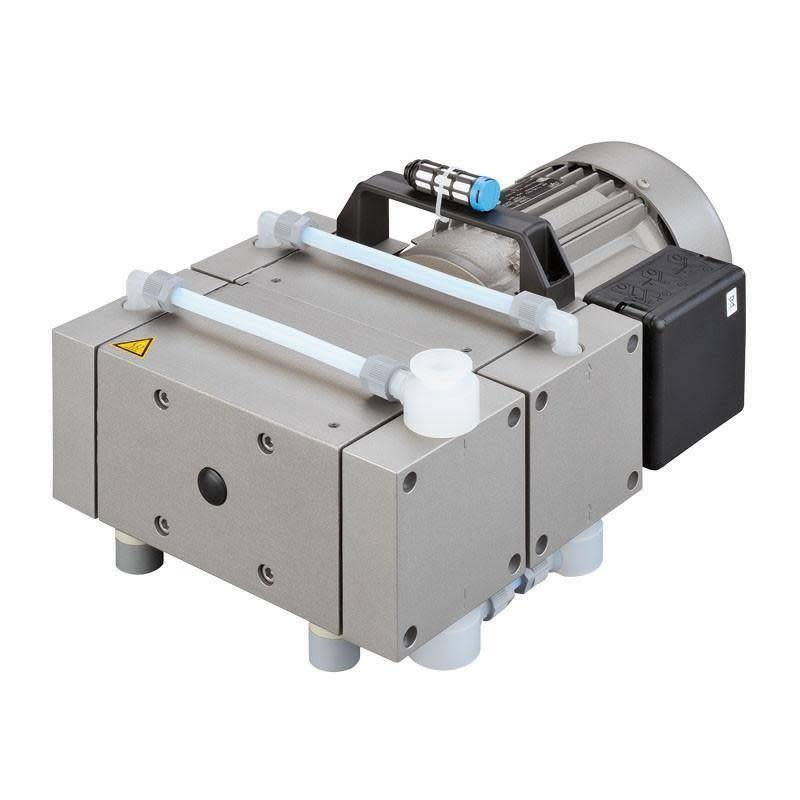
If this system must be vacuumed down for any reason, whether to remove oxygen that would cause degradation, or to control the flow of vapors, a vacuum pump must be chosen. If there are corrosive solvents being used, a specialty pump will be needed to handle these corrosive vapors without breaking or causing a fire. Ultimately, the strength of the vacuum pump will be decided on the size of the reactor, and the depth of vacuum that must be achieved. At the end of this blog is a link to an article detailing the various types of vacuum pumps and how to select yours.
Step 8 - Choose a Vacuum Manifold and Controller

Once you have selected a vacuum pump, it is important to decide how to connect it to the reactor. Is the vacuum pump being connected to any other systems? If so, a manifold with multiple valves and connections will be needed to link one pump to various systems. Consider how you will throttle the strength of the vacuum pump, you will need to be able to control how fast the pump is pulling air out of the system. At the very least, a user should use a handle needle valve to choke the flow of the pump and open it as needed. Ideally, there would be an electric vacuum controller that has programmable settings that maintain exact vacuum levels without a technician. As for any vacuum pump, a vacuum gauge is absolutely necessary, such as a digital vacuum gauge.
Step 9 - Choose Your Condenser and any Additional Glassware

The condenser you select is based entirely upon what you plan to capture. For instance, if there is no vacuum pump connected to the system, and no need to separate vapors from the solution, then a reflux condenser is perfect. A reflux condenser will capture any vapors that make their way out of the solution, recondense them into liquid, and return them into the reactor vessel. However, when there is a vacuum pump connected, these volatile vapors cannot be allowed to make their way to the pump. Wherever the pump is connected to the reactor, a condenser or cold trap must be used to condense the vapors back to liquid state before they pass onto the pump as volatile gas. Also, if the vapors of a solvent are meant to be removed and stored separate from the solution, a sideways or tilted condenser will be angled in such a way to capture these vapors and condense them into a different collection vessel, thus acting as solvent recovery. Determining glassware needs can be difficult and we are available to assist in the production, selection, and design of any additional glassware for your setup as these are the final steps of the reactor skid.
Plumb Your Reactor
Are you feeding your solution from a large feeding tank? Is the solution being drained into a separate system such as a rotary evaporator? Are you planning any post processing filtration? These questions will decide how the reactor will be plumbed to any external systems. A reactor can be used as a stand alone unit, but is more commonly one piece in a larger system used for refining, extracting, crystallizing, or filtering bulk solutions.
Conclusion
Designing and planning a reactor is a lot of work, and we at Goldleaf are here to help. Always feel free to call or email with any questions. To start production on your custom reactor skid, please fill out this Custom Request Form to explain what you need. A phone consultation and quote will follow shortly after.
Goldleafs mission is to provide the perfect lab solution to any scientific application, so please feel free to reach out for any help designing your new system. Send us you plans and requirements for your system, and we will build it for you!
Custom Request Form
Links to additional blogs:
![]()
Comments
Be the first to comment...