
You have no items in your shopping cart
Looking after Mechanical Vacuum Pumps
- Posted on
- Posted in Maintenance Guides, Vacuum Pump
- 0
This article is written for vacuum pumps such as the oil sealed rotary piston pumps used on many heat treating and vacuum furnace applications. The same information would also apply to the oil diffusion holding pump if it is used. This pump may be either a vee belt driven pump or a direct drive pump. The holding pump is used to keep the oil diffusion pump evacuated below the critical backing pressure when the main pump is in roughing mode.
All mechanical vacuum pumps need maintenance and the pump manufacturer usually lists the basic checks needed in the pump operation manual. This will vary with the application that the pump is used on but, at a minimum, will include the following:
- Check oil level daily or weekly, depending on the application and use
- Change oil and check the shaft seal area for leaks every 6 months
- Inspect the exhaust valves and gas ballast valve seals every 12 months
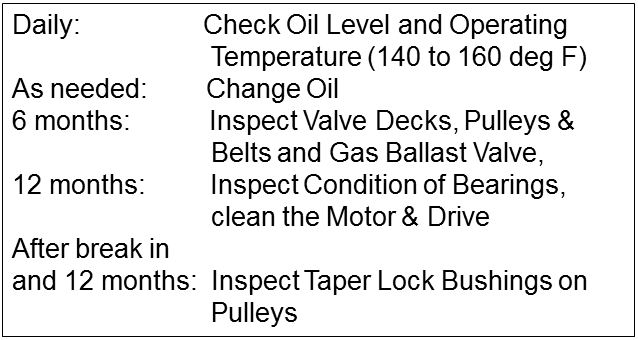
On checking a copy of the Microvac Rotary Piston Pump Manual, Maintenance Section, the suggested maintenance plan included a few additional checks, as shown on Fig. 1. The information from that part of the pump manual is rewritten here and my own comments added.
Safety Information
When working with any vacuum pumps and equipment there are a number of safety considerations to be aware of. All operators and maintenance employees should have specific training on this information prior to using, operating or working on the vacuum system.
The maintenance technician should be trained and supervised and obey local and national safety rules.
Pump fluids can be hot and contaminated by the process. The technician should be aware of these possible hazards. Wear the correct PPE (personal protective equipment)
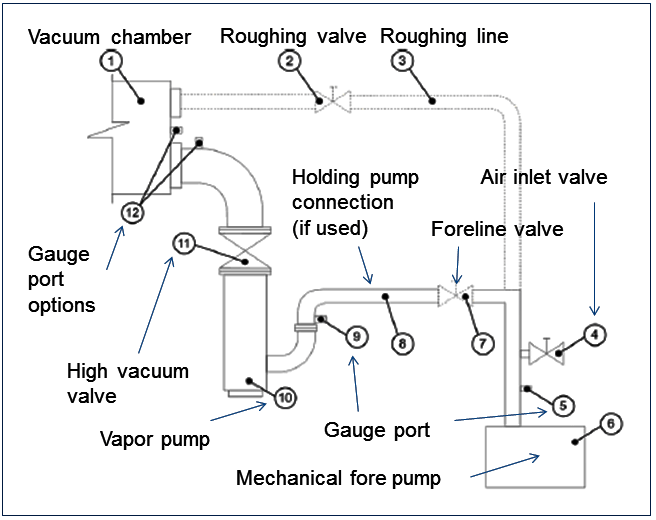 |
| Fig. 2: Typical vacuum system piping |
Before any work is carried out on the vacuum pumps or vacuum system, make sure all required parts are available. Downtime is expensive.
Lockout the electrical supply to pumps motors and other electrical equipment before starting any maintenance work.
If working on the vacuum pump, allow the pump to cool to a safe temperature and let the system up to atmospheric pressure.
All seals and o-rings should be replaced if taken apart. The elastomers can become hard and brittle due to friction and heat. They will lose their elasticity and may have small fractures in the material. Static trapped o-rings can become flattened or misshapen due to prolonged pressure in the connection.
After working on the vacuum pump, check for correct rotation when the electrical supply is reconnected.
If the vacuum pump was severely overheated, or if there was a fire, be aware that fluorinated materials can decompose into very hazardous substances over 590°F. This would include fluorinated fluids, o-rings and seals.
Maintain the electric motor as specified by the manufacturer.
Leak Detection
If the ultimate vacuum of the vacuum pump or the expected base pressure of the vacuum system cannot be attained, the system may need to be leak tested.
The first check is always to test the mechanical vacuum pump for its best vacuum. The vacuum pump should be isolated from the rest of the system with a valve, and a vacuum gauge head installed between the isolation valve and the inlet of the pump. If the expected vacuum is not seen the vacuum pump should be checked and serviced as needed.
Once the main vacuum pump is creating the expected ultimate vacuum, the system should be checked again for base pressure. If it is not achieved the leak test is carried out.
 |
| Fig. 3: Oil level and Flow indicator |
The typical vacuum system piping is shown in Fig. 2. Each section of piping is leak tested working from the fore pump to the chamber until the leak is located and fixed.
While researching this article I looked at an original Stokes Vacuum Microvac manual section regarding pipe connections. It mentioned welded joints and soldered joints as being suitable as leak tight connections for vacuum use. The instruction went on to say that threaded connections may be easier and to add pipe dope to the male thread on assembly and to never back off a connection for alignment as it is likely to cause a leak. This is all good information as liquid pipe dope or liquid thread sealer will fill the voids in a threaded connection and make it leak tight, whereas Teflon tape will not completely fill these voids.
However, it went on to recommend painting the piping while the system was under vacuum and to paint the threaded connections “until no more paint is drawn into the thread”. I’m not sure if that would meet “good engineering practice” requirements, but this document was dated 1999.
Oil Change
Allow time for the oil to cool down.
Lock out the power supply and vent the system to atmosphere. In humid conditions the chamber may be left under vacuum and just the pump and relevant piping let up to atmosphere.
Review possible process contaminants, select correct PPE and have clean oil, flushing oil (if used), containment supplies and cleaning materials available. Drain old oil, flush as needed, and refill pump to correct level. Clean up and dispose of waste fluid according to local rules.
Check for hazards and restore power to pump and/or system. Start pump and recheck ultimate vacuum.
Oil level check
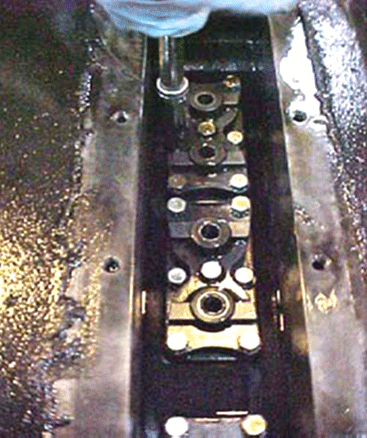 |
| Fig. 4: Microvac 412 valve decks, 8 valves |
The oil level should be checked daily. Its quality may not be visible in a small sight glass (Fig. 3) but the oil flow indicator may be a better place to see if the oil is dirty or contaminated. While in operation the oil level will be a bit lower on the oil level sight glass as the oil is being circulated around the pump interior. When the pump stops the oil level will return to its original level.
If the process has a lot of water or other condensable vapor the oil sight glass level may get higher as water mixes with the oil. Gas ballasting will help exhaust the water vapor before it condenses in the oil. Most European vacuum pump manuals indicate how much water vapor the pump can handle per hour when using the gas ballast valve, but I could not find a similar specification in the Microvac manuals. The Microvac manual says that if there is a lot of water in the oil you can stop the pump, let the oil and water settle for a half hour or so, and then drain the water out through the drain valve. Close the drain valve when oil starts to drain out. Certainly water in the lubrication oil should not be left there as it will promote rusting of metal parts. If this is the case it should be done at the end of the shift or between production runs if the system is running a three shift operation. A better option may be to install a condenser near the pump inlet to reduce the amount of water entering the pump.
If the oil appears milky the oil is too contaminated to clean up. The old fluid mixture will have to be drained, the pump flushed to clean out any residue and then refilled with clean oil. Water in the pump oil will re-evaporate on the low pressure (inlet side) of the pump and will reduce the pump efficiency and the vacuum attainable.
I had a call last year from a Microvac pump user who was seeing milky oil. His process was not wet but he kept getting lots of water in the pump oil. This turned out to be a leak in the water cooling coil inside the vacuum pump sump. It’s not always the process.
Valve deck maintenance
Ensure that you have all parts needed including new gaskets before starting this procedure.
As before, all power should be locked out. Drain the oil from the pump. Removing the reservoir cover will allow access to the valve decks but the oil and mist separator will also have to be removed.
Remove all screws from the valve deck or decks being careful not to drop any inside the pump. This area may have some residual oil around the valve decks but it will drain into the pump stator once the valve decks are removed.
 |
| Fig. 5: New style valve deck |
The old design valve decks (Fig. 4) on the Microvac pump had metal valve discs that lifted against open springs. These springs could cause damage to the pump interior if they broke and parts entered the pump. The new design valve decks (Fig. 5) have springs that are fully captured by the valve plate and the top cover. This eliminates the possibility of damage but the springs can still break if not changed frequently enough. The new valve plates are also made of a thermoplastic and are quieter than the original steel discs.
Once the valve decks are rebuilt they can be installed using new gaskets, the oil mist separator replaced, again with a new gasket, and finally, the reservoir cover too, with a new gasket.
Belt maintenance
Have all new parts available that may be needed. Lock out the power and vent the pump to atmosphere.
If the pump mechanism is turned while there is vacuum on one side and atmosphere on the other, the pump may rotate unexpectedly and perhaps trap a finger in the pinch points on the belt drive. If working with a partner, always check with the partner before moving or rotating a belt drive.
Remove the belt guard and visually check the vee belts. Check the belt tension and alignment. A vee belt tension tester and vee groove gauges are shown in Fig. 6.
Remove the belts and check the pulleys for wear on the inner surfaces and check that the taper lock bushings are tight. If one belt is faulty, replace all belts. Tension the belts according to the manufacturer’s instructions. Over tension can overload the pump and motor bearings and in a worst case cause the shaft to fail from fatigue. Belt tension is adjusted by raising or lowering the motor support using the jack screws and nuts.
Replace the belt cover, restore power and make sure that the pump operates correctly.
(Recheck the belt tension for a few days after replacement as they will tend to stretch slightly. If they become loose they may slip.)
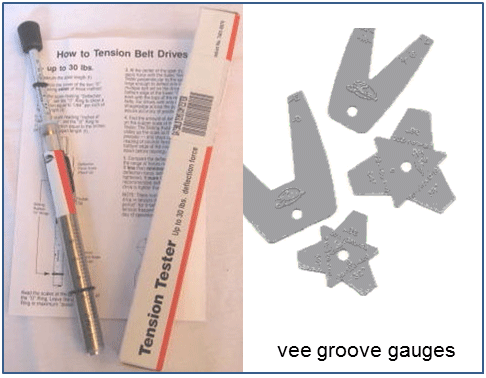 |
| Fig. 6: Vee Belt Drive tools |
On the Microvac 212 a center belt force of 3-5 lbs. should give 7/16” deflection of the belt. For the Microvac 412 it is 5-7 lbs. and a deflection of ½”.
Gas ballast check valve replacement
If the gas ballast valve is used frequently, replace the check valve every two years. Lock out the power so that the pump can’t operate.
Remove the valve stem and use a suitable pick to remove the check valve. Replace it if the spring is damaged or broken. Reinstall the stem valve. Restore power and check for correct operation.
This information covers maintenance procedures for the rotary piston type vacuum pumps. If the holding pump used is a direct drive pump, then obviously the vee belt drive information will not apply. For direct drive vacuum pumps the rubber spacer or “spider” between the motor to pump coupling halves is the part that should be checked. These can work harden and disintegrate with heat or fail due to oil contamination. A noisy coupling often indicates a lack of clearance or misalignment.
Copyright Howard Tring, Tring Enterprises LLC Vacuum & Low-Pressure Consulting.
Comments
Be the first to comment...