
You have no items in your shopping cart
Vacuum Pump Maintenance
- Posted on
- Posted in Maintenance Guides, Vacuum Pump
- 2
How to maximize the life of your pump
To maximize your investment and produce repeatable high-quality process results, it is mandatory to institute a thorough pump preventative maintenance program. In a pump’s normal operating life, nearly all unexpected vacuum pump failures can be prevented, and when carefully maintained, a vacuum pump will provide years of reliable service (Fig. 1).
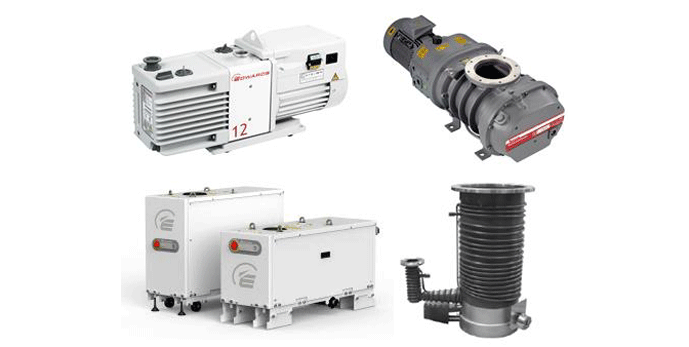 |
| Figure 1 | Typical vacuum pumps found in a heat treat shop, top left to lower right: rotary vane oil pump, roots blower, dry screw pump, and diffusion pump (courtesy of Edwards Vacuum) |
Be Organized and Document Everything
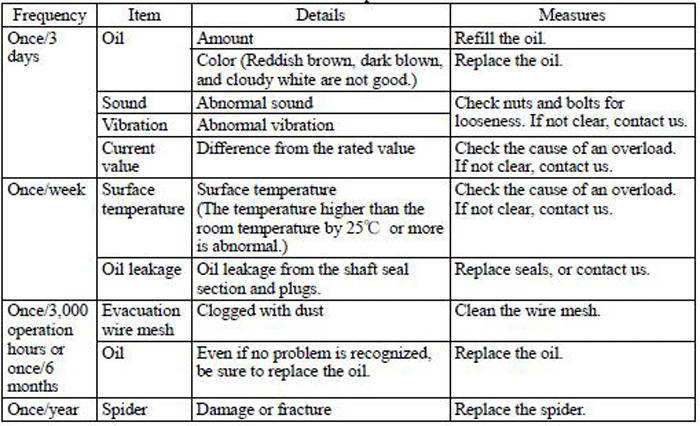
Start by generating a checklist of routine maintenance activities (Table 1). The pump manufacturer typically provides this as part of the operating manual. Second, incorporate a maintenance log documenting all routine maintenance, repairs and component replacement.
The log will play a critical role in diagnosing future problems, scheduling various maintenance activities, and stocking spare parts. Install a running hour meter to document the number of operating hours on the pump between service activities and enter this into the log. If possible, measure and electronically record the vacuum before and after the pump during every operating cycle, as well as the pumpdown times and ultimate vacuum level achieved in the furnace. This information is often collected and stored as data points in the furnace’s data acquisition system for process reasons. It can also be useful for planning and scheduling maintenance. Changes in these variables can be programmed into the furnace control system to notify the operator when a maintenance inspection or a specific maintenance activity is necessary.
 |
| Table 1 | Sample Maintenance Checklist (courtesy of Kurt J. Lesker Company) |
Keep in mind the purpose of your preventative maintenance program is to prevent your vacuum system from breaking down and causing costly repairs and interruptions in production. Taking the time necessary to perform routine maintenance must not take a back seat to production because in today’s world of just-in-time inventory, an unexpected shutdown can take days or weeks to repair due to the lead time in obtaining replacement parts. The most successful organizations devote sufficient time and training up front to avert these expensive, disruptive occurrences before they happen.
Oil Changes and Inspection
For wet pumps, such as primary rotary vane pumps and diffusion pumps, oil contamination is one of the most common maintenance concerns. As the lifeblood of the system, the oil must be carefully maintained and changed at proper intervals. Over time, pump oil can become oxidized or contaminated by vapors from the process, resulting in reduced lubricity.
The oil can be contaminated with moisture, in which case the absorbed water vapor will flash off during pumping, consuming a significant portion of the pump’s capacity. In diffusion pumps, the use of hydrocarbon based oils can leave a burnt residue on the pump interior and potentially clog the vapor jets. Silicone based oils are less prone to this oxidation and are required for diffusion pumps. With dry pumps, oil does not mix with the pumped gas and therefore burning and oxidation are not a concern, but oil is used to lubricate the bearings and gears so it must be changed periodically.
Most manufacturers recommend changing the oil every 3,000 hours at a minimum. It is not unusual, however, to change the oil every week or month for more demanding applications, or even after every operating cycle in the most severe cases. The most common indicators that oil needs to be changed are: (a) a dark appearance with or without the evidence of particulates, (b) inability of the pump to reach its ultimate vacuum with the inlet valve closed and (c) a milky appearance, an indicator of water/moisture present in the system. Before changing the oil, it is recommended to run the pump for a few minutes, and then turn it off. The oil will flow and drain more thoroughly when warm. If the drained oil is very dirty, you may consider repeating the process until it runs clear. This is a sign that the oil should be changed more frequently in the future. Between oil changes it is recommended to periodically drain a small amount of oil and compare it to a test tube of clean oil used as a reference. The color, clarity, and quantity of particulates can then be assessed. The symptoms of contaminated oil include inability to reach ultimate vacuum, excessive noise, and eventually pump damage and failure.
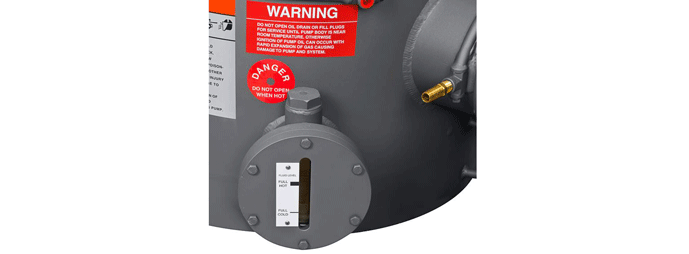
Check the oil level frequently. It is typically viewed through a site glass on the pump (Fig. 2). If lighting is poor, it is recommended to use a flashlight to observe the oil level as it can be difficult to see. There are sometimes
different fill lines for the pump depending on whether it is cold or hot.
 |
| Figure 2 | Site Glass on an Agilent Oil Diffusion Pump (courtesy of Ideal Vacuum Products) |
Improper oil level will affect the pump in many ways, whether too low or too high. If the oil level is too low, exhaust valves and blow-by valves can’t function properly, and the pump seals won’t work, resulting in a measurable loss in performance indicated by higher inlet pressures. Too much oil can cause the sump to become over pressurized during periods of high gas loads resulting in excess oil mist, oil frothing, and oil being discharged from the outlet.
Every time the oil is changed, the filters should be changed too. This includes cleaning or replacing the filter in the oil mist eliminator.
Oil Leakage
For oil sealed rotary vane pumps, a significant amount of oil can build up on and around the pump during normal operation, especially if the pump experiences high gas loads. As a result, it is common for the pump exterior to have a light film of oil. This can make it difficult to identify oil leaks visually, and is why the oil level should also be closely monitored. With the pump off and locked out, the pulleys, belts, and belt guard interior should be inspected for signs of oil. Common sources for leaks include the shaft seal, oil level windows, and drain valve/cap. Leaking at the windows will usually leave a stain trailing down the pump case and a leaky seal can cause oil to pool below the leak. Although all leaks should be repaired promptly, it is especially important to repair leaking shaft seals immediately, because a bad shaft seal can damage the shaft, requiring an expensive and time consuming replacement.
Drive Belts and Couplings
The drive belts should be examined, always with the pump turned off and locked out. The belt surfaces should be dry and free of oil. If a belt shows cracks or glazing (polished areas indicating the motor sheave spinning against a stationary belt), it should be replaced. Inspect the interior of the belt guards for dust generated by belt wear. If the belt is oily, this can indicate a leaking shaft seal. When the belts are replaced, the motor often needs to be adjusted to maintain proper tension.
To check the belt tension, put pressure on the center of the belt, at the midpoint between the two sheaves. Although a tension gauge is best, experienced technicians sometimes do this manually. If the belt can be pushed down more than half an inch, you will have to adjust the tension.
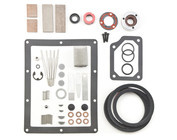
In lieu of drive belts, direct drive pumps use a coupling (aka coupler or spider) between the motor and pump shaft (Fig. 3). This coupling should be inspected for excessive wear, looseness or misalignment. The coupling should not show cracks or fractures.
 |
| Figure 3 | Spider Coupling in a Direct Drive Pump (courtesy of Kurt J. Lesker Company) |
Ultimate Vacuum Test
Close the inlet valve, operate the pump and check the pressure between the valve and the pump. This will be the ultimate vacuum, and is a good overall check of the pump condition. This reading should be recorded in the log since any change can reflect a potential problem. While at ultimate vacuum, measure and record the motor amp draw. Since amp draw is directly proportional to the horsepower generated by the motor, this reading will indicate how hard the motor is working to achieve vacuum. If the maintenance log indicates that amp draw is changing over time, further analysis is necessary to find the cause. The goal, of course, is to use this information to prevent pump failure before it occurs.
Bearings
The main shaft bearings are critical to the service life of the pump. Gradual wear may allow a shaft position to change slightly until rubbing develops between the screws or rotors, or the impeller and pump housing. This will cause spot heating that can be detected by touch. Sudden bearing failure is usually more serious. Since the impeller shaft assembly is no longer supported and properly located, extensive general damage to casing and gears is likely to occur immediately after the bearing fails. Indications of worn bearings are excessive or unusual noise, overly hot bearings, or overly hot casing caused by friction resulting from contact between the rotating impellor and the casing interior.
Internal Inspection and Cleaning
Vacuum pumps should be dismantled and inspected after every 3000 hours of operation. For oil sealed rotary pumps, the vanes (Fig. 4) should be inspected for cracks or excessive wear and replaced if necessary. When replacement is necessary, they should always be replaced as a set. Diffusion pumps (Fig. 5) should be checked for contamination of the nozzles and buildup of deposits on the interior surfaces (Fig. 6). After inspection the interior must be thoroughly cleaned because even fingerprints outgas and can cause contamination of the process. Common industry practice for cleaning diffusion pumps is to use acetone and then an isopropyl alcohol rinse to clean internal pump components (e.g., pump body, jet assembly). Dry screw pumps, claw pumps, and roots blowers should have the screws or rotors inspected for wear and excessive clearance between the rotors. When the rotors need to be replaced, they must be replaced in pairs. If your in-house maintenance personnel do not have the expertise or the time to perform the internal inspection, it can be outsourced to the pump manufacturer or a third party service provider.
 |
| Figure 4 | Rotary vane pump with end cover removed (courtesy of Edwards Vacuum) |
The timing gears should show negligible wear for years during normal service. Gear teeth are provided with the correct amount of backlash, and a reasonable amount of tooth wear can normally be accommodated without permitting contact between the impellers, claws, screws or rotors. A high oil level in the gearbox will cause churning and excessive oil heating, indicated by unusually high temperature in the bottom of the sump. If operation is continued under either too high or too low of an oil level, the gears can overheat and the teeth will wear quickly, which will lead to contact of the rotors and rapid failure.
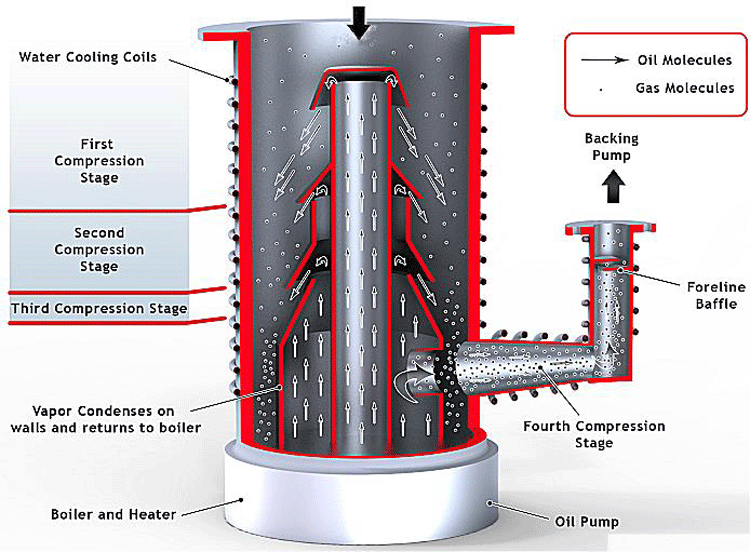 |
| Figure 5 | Cutaway view of a diffusion pump (courtesy of Edwards Vacuum) |
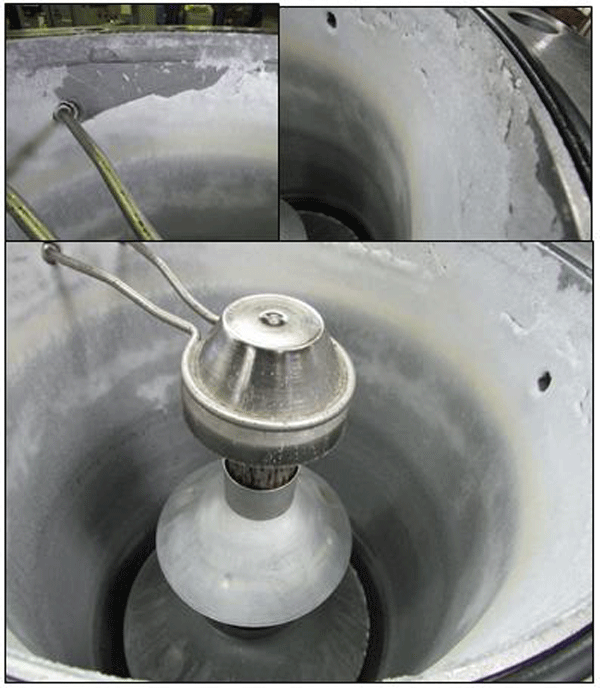 |
| Figure 6 | Interior Views of a Diffusion Pump Showing Contamination Exhibited by a White Deposit |
Summary
Simple stated, take care of your vacuum pumps and they will take care of you.
References
1. Kurt J. Lesker Company (www.lesker.com)
2. Edwards Vacuum (www.edwardsvacuum.com)
3. Ideal Vacuum Products (www.pchemlabs.com
Great maintenance tips! Regular care truly helps prevent downtime and extends the lifespan of vacuum pumps. Click here : https://economysolutions.in/vacuum-systems/
This article is a goldmine of practical tips for pump longevity. As a facility manager, I'm well aware of the investment vacuum pumps represent, and these insights are invaluable. From proper installation to regular maintenance, every point resonates with the need to prioritize longevity. The emphasis on clean air intake and monitoring performance over time is especially noteworthy. It's evident that a well-maintained pump translates to cost savings and uninterrupted operations. This comprehensive guide serves as a roadmap for maximizing pump life and efficiency, making it an essential read for anyone responsible for industrial equipment.